Welcome to the help for Information classifier©! Here you find all information you need in order to be self-going using the tool. If you need more assistence, please refer to the More help section.
Help index
Introduction
Installation
Configuration
Applying stereotypes
Classifying
Linking
Run the built-in report
More help
Introduction
Information classifier is a powerful tool that enables single point of documentation and control of information classification of all the information handled in an organization, information ranging from business objects such as agreements, messages sent between systems, logs and database tables.
The tool creates a central repository for all information and a single point of classification of the information. All other business related information then relates to the central repository and is included in summarizing reports for this information.
Finding the add-in location in Sparx EA
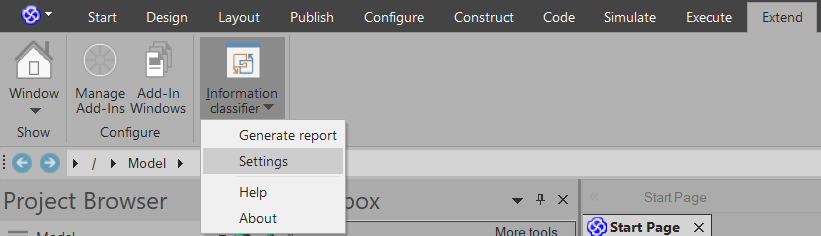
The tools uses to ways to initiate operations – via main menu and right clicking. The Information classifier functionality is for the mentioned locations found at:
- Main menu -> Extension -> Information classifier
- Right click -> Extension -> Information classifier
Note: Right click can be performed on any type of element – in the Project browser or in diagrams.
Important notices
Information classifier comes with a standard setting configured to the built-in Sparx technology. For users that wish to use an own technology (stereotype setup), there is a need for configuration in order to make Information classifier use your setup. Please read the configuration information for customization and adaptation to your organization’s structure and need. The built-in report relies upon the standards of the tool – if you change these you will have to create own reports to retrieve the wanted information.
Information classifier offers unclassification and unlinking menus. These choices activate the selected function on the selected element and all its children, such as attributes. I.e. the operation will not only affect the selected element.
Installation
Please read the installation section in the download page.
Configuration
In this section you find information for how to configure your instance of Information classifier.
Image: Opening of the settings dialog
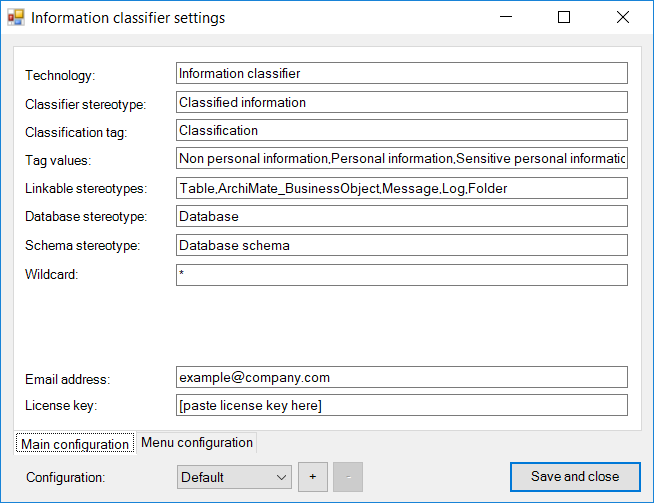
Image: The settings dialog (with default settings after installation)
Below are descriptions of each Settings dialog fields on the Main configuration tab:
- Technology – The Sparx EA technology where the classification stereotype resides
- Classifer stereotype – The steretype that is to be used on classification
- Classification tag – The tag name that holds the actual value on the element
- Tag values – A no-space, comma separated list of classification levels, presented left-to-right
- Linkable stereotypes – A no-space, comma separated list of elements that allow linking to classified information
- Linkable consumers – A no-space, comma separated list of elements that can be linked indirectly to classified information (i.e. linkables). Example folders
- Database stereotype – The stereotype used to represent databases in Component elements
- Schema stereotype – The stereotype used to represent database schemas in Component elements
- Email address – The email address for THIN2K to contact your organization. Base for license key
- License key – The license key distributed from THIN2K on registered license purchase
Tag values: The built-in standard report regards all but the first value as personal. I.e. the first value is dedicated to a ”Non personal information” value.
The Menu configuration tab offers ability to change menu settings so that user experience can be localized and/or balanced to the other parts of the configuration.
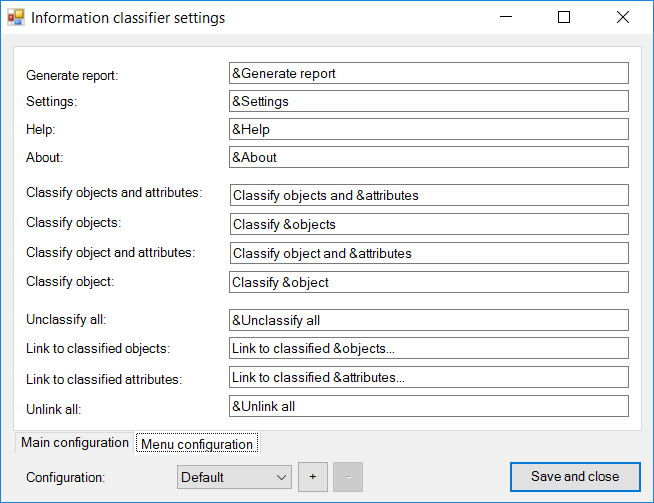
Image: Menu configuration tab
Below are descriptions of each Settings dialog fields on the Menu configuration tab:
- Generate report – Menu item to start the report generation
- Settings – Menu item for opening of the Settings dialog
- Help – Menu item for opening of help page
- About – Menu item for opening of the About dialog
- Classify objects and attributes – Menu item for classification of objects and attributes at the same time
- Classify objects – Menu item for classification of objects
- Classify object and attributes – Menu item for classification of a single object and attributes
- Classify object – Menu item for classification of a single object
- Unclassify all – Menu item for unclassification of object(s) and attributes
- Link to classified objects – Menu item for linking between tables/objects and classified objects
- Link to classified attributes – Menu item for linking between columns/attributes and classified attributes
- Unlink all – Menu item for unlinking of both object(s) and attributes
Applying stereotypes
For some elements you need to apply aInformation classifier specific stereotype. A stereotype is a way to note an architectural model element to be of a certain, more specific type than just a ”general” model element. The Information classifier built-in stereotypes that you will have to set manually are:
- <<Folder>> applies to Sparx EA Component
- <<Log>> applies to Sparx EA Artifact
- <<Message>> applies to Sparx EA Class
- <<Database>> applies to Sparx EA Component
- <<Database schema>> applies to Sparx EA Component
To apply a stereotype:
- Open the Property dialog in Sparx EA for the element that you want to apply a stereotype
- Click the elipse button (…) close to the stereotype field
- Select Information classifier
- Click the checkbox for the stereotype you want to apply
Note: Information classifier is pre-configured to use the widely used ArchiMate notation for business objects. Application of ArchiMate business objects follow the same schema as above, but with another technology in use.
If you want to create new model elements and not have to add stereotypes by hand as described above, you can create a (or open an existing) diagram and use the pre-defined toolbox for the element types/stereotypes that are added in Information classifier.
To create an Information classifier diagram with built-in toolbox, do the following
- Right click in a package in the Project browser where you want the new diagram
- Select Add Diagram…
- Click Information classifier diagram in the left pane
- Click Classification diagram in the right pane
- Click OK
You can now easily add new classification concepts to your model.
Note: Stereotypes not shipped with Information classifier are not listed in the toolbox. Please visit the documentation for those stereotypes.
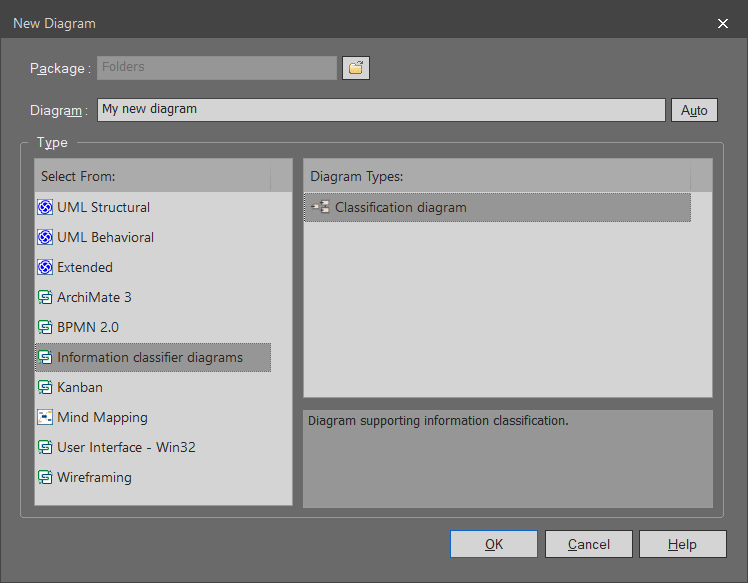
Image: Information classifier diagram
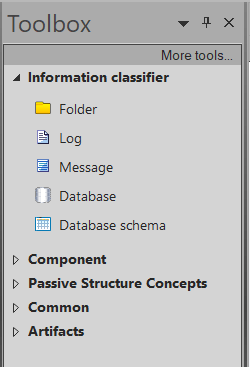
Image: Information classifier toolbox
Model structure
In order to make the tool work in an optimized way, you need to structure the model according to the standards of the tool. Business objects (information consumed in business process) and information objects (that are to be classified) can reside in any type of package. However, tables should reside in a structure as follows:
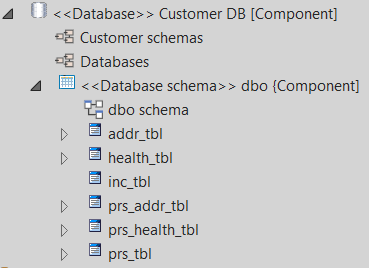
Image: Database structure for optimal tool compliance
By structuring the database model parts as above, you get good structure enabling discoverability and well working classifying tool. Please use the built-in stereotypes for <<Database>> and <<Database schema>>.
Classifying
Classifying is the process of setting the appropriate class level for information. In Information classifier this is done via ”right click” in the Project browser in Sparx. Different menus will appear on different levels (package, component, class, attribute), but the main usage is the same. The only difference at different levels is that the number of elements affected will increase higher up in the model structure.
GENERAL CAUTION FOR CLASSIFICATION: Use higher level application of classifying with care since the chosen operation will ripple through all sub levels of the model.
Classification menus
Classification menus will appear for element types that are not registered as Linkables in the Settings dialog. Packages are general and show both classification and link menus.
In summary, the following areas can be controlled by right clicking:
- Package
- Element
- Diagram
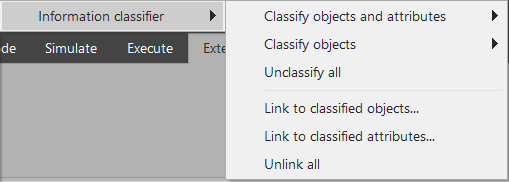
Image: Right click on package
For classification of objects there is a choice between classification of only the object (without the attributes) or classification of both object and attributes. All classification menu sets also offer an unclassify option which will reset all previous classification for both objects and attributes.
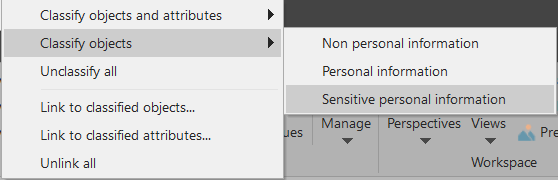
Image: Right click menus for classification levels
The classification levels are dynamic and read from the comma separated set of tag values in the Settings dialog. Read the configuration section for details.
Linking
Linking is the process of relating all your organization information to the centrally managed classification model (the information model). Linking can be done from any type of element that is not marked as classified information itself.
GENERAL CAUTION FOR UNLINKING: Unlinking may be performed on packages. When doing so, all contained elements in any child package will be completely unlinked.
Link menus
Link menus will appear for element types that are registered as linkables in the Settings dialog or are database oriented stereotypes. Packages are general and show both classification and link menus.
Information classifier comes with a pre-defined set of linkable object types:
- ArchiMate_BusinessObject
- Message
- Log
- Table
- Database
- Database schema
Note: You can edit the set of linkables in the Settings dialog.
Business object linking
Business object linking is used to associate your business information such as agreements to the central information model. Business information is the information produced and consumed in business processes and hence also often visible in the business process documentation. Business objects out-of-the box is set to ArchiMate® eventhough you easily can configure business objects to any other type in the Settings dialog.
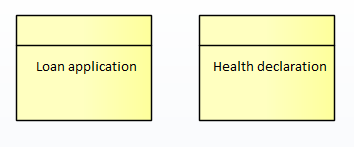
Image: Business objects using ArchiMate
Folder linking
Folders are containers in the file systems that store information. Some folders may hold sensitive personal information and need to be documented. Folders may be personal to the user or shared with others. Also, folders have a location in the file systems and sometimes external address for access from outside, for example FTP uploads. Folders are components stereotyped to <<Folder>>.
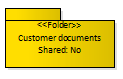
Image: Folder appearence
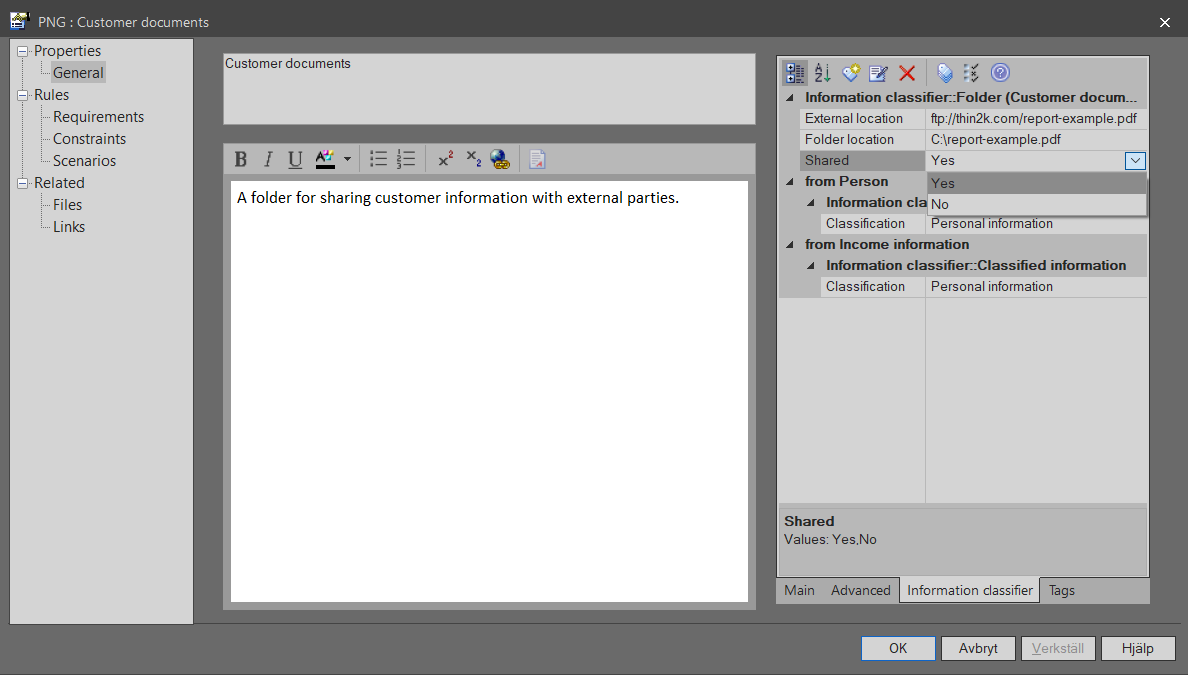
Image: Folder tagged values
Message linking
Messages are information units sent between components in the IT landscape. Messages are documented using the business language so that both business representatives and IT share a common understanding. Messages can be linked to classified information out-of-the-box since Information classifier supports both stereotypes for <<Message>> and is pre-configured to support linking of such objects. Messages are modeled using classes stereotyped to <<Message>>
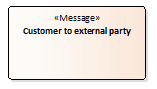
Image: Message
Log linking
It is important to keep track of logs since they can hold sensitive information. Hence Information classifier supports stereotype <<Log>> and is pre-configured for support of linking from logs to classified information objects. Logs are artifacts stereotyped as <<Log>>.
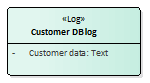
Image: Log example
Database linking
Database linking is used to associate your database information such as tables and columns to the information model. There are two types of linking that can be made:
- Linking between tables and information objects
- Linking between columns and information object attributes
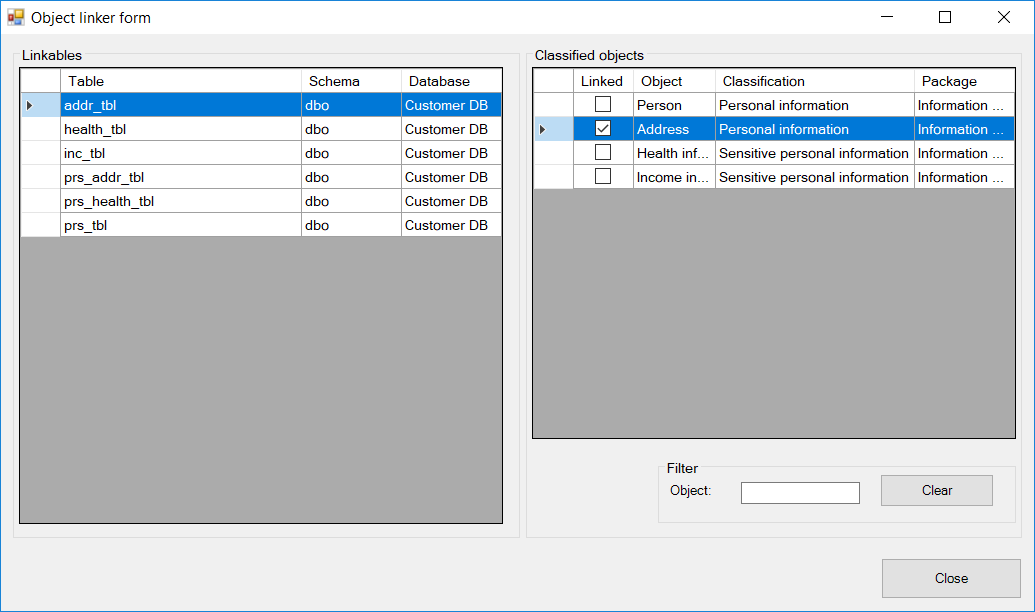
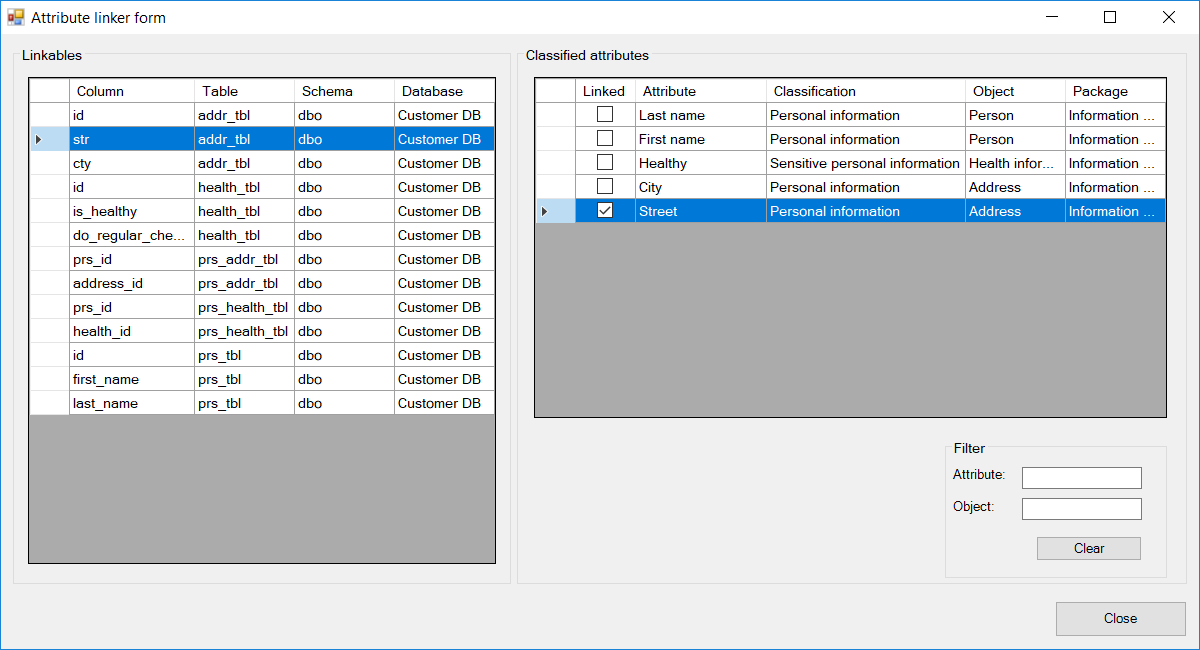
Image: Example of linking between columns/non classified attributes and classified attributes
System linking
Systems are linked with the help of dependency relations from the system itself to the database that it is using. If the database contains tables or columns that relate to information classified as sensitive somehow, the system will be listed in the report with name, short description and the databases that contain sensitive information.
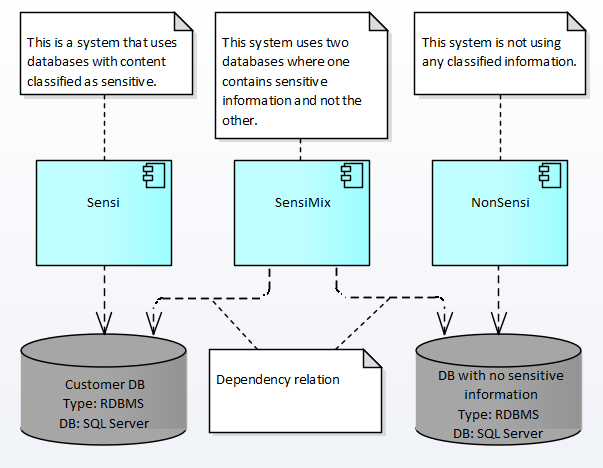
Image: System dependencies to database that will render listing in report if database contains sensitive informatio
Report generating
Information classifier comes with a built-in standard report for summarizing of commonly recurring business aspects needed to have control over regarding the information sensitivity levels. The standard report summarizes information in the following order:
- Business objects linked to classified information objects
- Information objects and their classification levels including tables that relate to them
- Messages linked to classified information objects
- Folders linked to classified information objects
- Logs linked to classified information objects
- Systems that use databases that in turn handles personal information
- Table columns linked to classified attributes including database and database schema name
Scroll to the end in this section to see an example report.
The core of the report is the information objects section where the actual classified information is represented. All other sections in the report shows different angles on how that information relates to the information objects.
Important: If you use your own stereotype and standards for classification, the built-in report will not work as intended. You will then have to create a report of your own. Please contact us at THIN2K for help in creating reports on your own configuration.
Run the built-in report
The built-in report will automatically find all linked information and add it to the report. Any area that is unlinked will be left out. Reports can be in two formats – PDF or Word. To change the format, change the extension in the file dialog.
To generate a report:
- Click Extend -> Information classifier -> Generate report
- Select a destination and file name
- Select format (PDF is default)
- Click OK
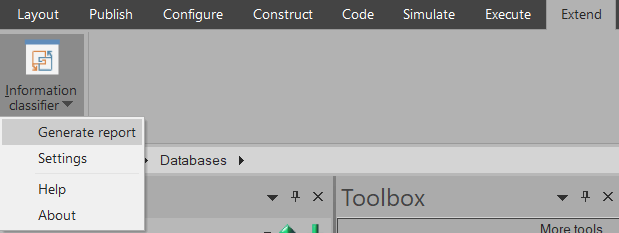
Image: Menu for report generation
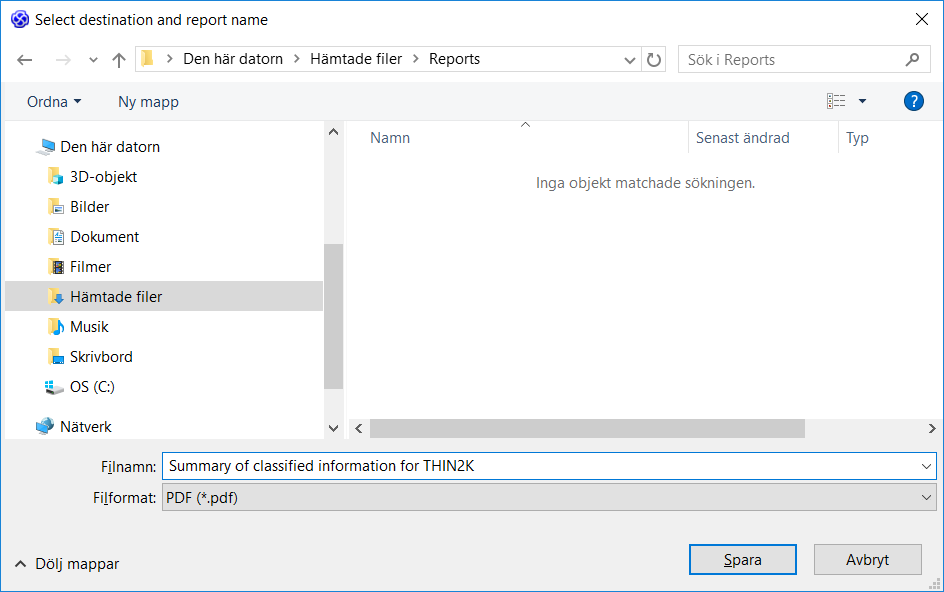
Image: File dialog for reports
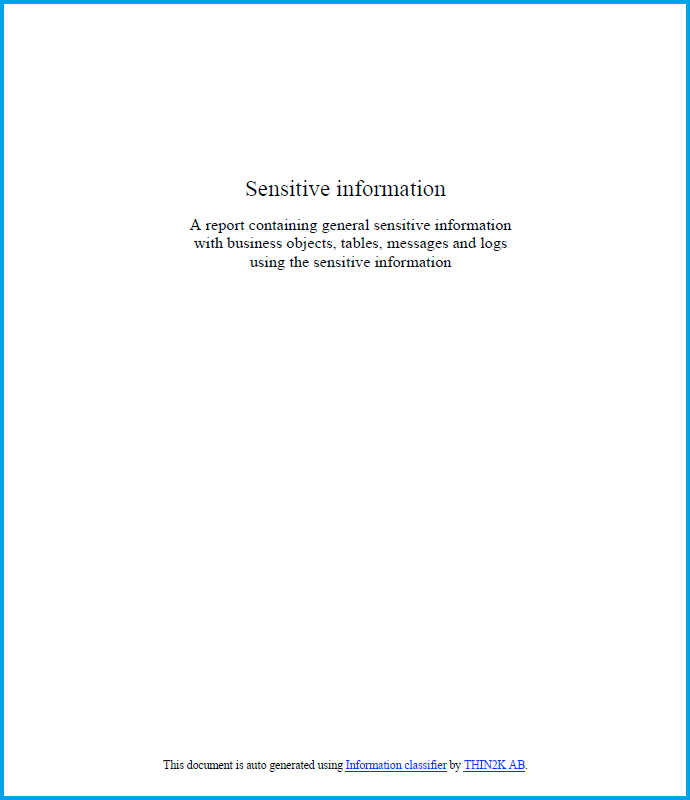
Image: Cover page of auto generated report
Example PDF of generated report: Classified-information.pdf (765 nedladdningar )
More help
If you need more help with the tool or customization of reports etc., please contact us at THIN2K via the contact page or just by sending an email to info@thin2k.com. We return with an answer as soon as possible.
Licensed customers have the possibility for online support. Please read more at Information classifier support.
We at THIN2K wish you the best for an efficient classification and control of all your organization’s information.
Go to the top.